Leap of Faith

Uncategorized

What a leap of faith it is to start seeds in February. To wake up early on a February morning to feed the woodstove and note not that it’s 5F outside but that the sun is up even earlier today, is belief in tomorrow. To think that this bitter cold, snow covered morning is the day to start seeds may seem madness to some; the true believers know that spring really is just around the corner. 

So, I prepare. I have a tall stainless steel shop shelving unit that I picked up at an auction years ago. It works well for seeds because the shelves are adjustable. I have most set about a foot apart which gives me enough room for the seed trays and to hang the shop lights above on a chain two inches above the plants. The shelves are not solid and are water resistant so water drips down to the level below. I use an old plastic toboggan as a water and soil catching tray on the floor under the bottom shelf. Each shelf is the width of a seed tray placed the short way. I set up two four-foot shop lights with reflectors side-by-side per shelf for two shelves. I have one shelf with no lights but with a bottom heat source. I use a rubber, heated floor mat for this then repurpose the mat in the shop to warm my feet in the late fall. This shelf is for germination which requires heat but not light. Finally, I have a taller shelf for potting up larger, tender plants that need to be kept warm until being set out after frost. I store a collection of pots and trays on top. This set-up allows me to start hundreds of seeds in only 10 square feet of floor space.

My favorite seed starting and potting mix is called BM1 a peat based mix from Canada. I soak the mix well with water in a pail to the consistency of chocolate pudding before adding it to trays and seeding. Then I don’t water again for about a week so as not to disturb the seed and burgeoning roots. I have trays in an assortment of sizes. I almost always start seeds at a very large density in a small six-pack size tray then transplant them to individual cell trays. the most common size I use are the 50 cell and 72 cell per tray sizes. Occasionally I transplant a second time to a 2″ or 4″ pot. I do this for plants I will sell as well as tomatoes who like to be transplanted and are kept indoors for longer than most.

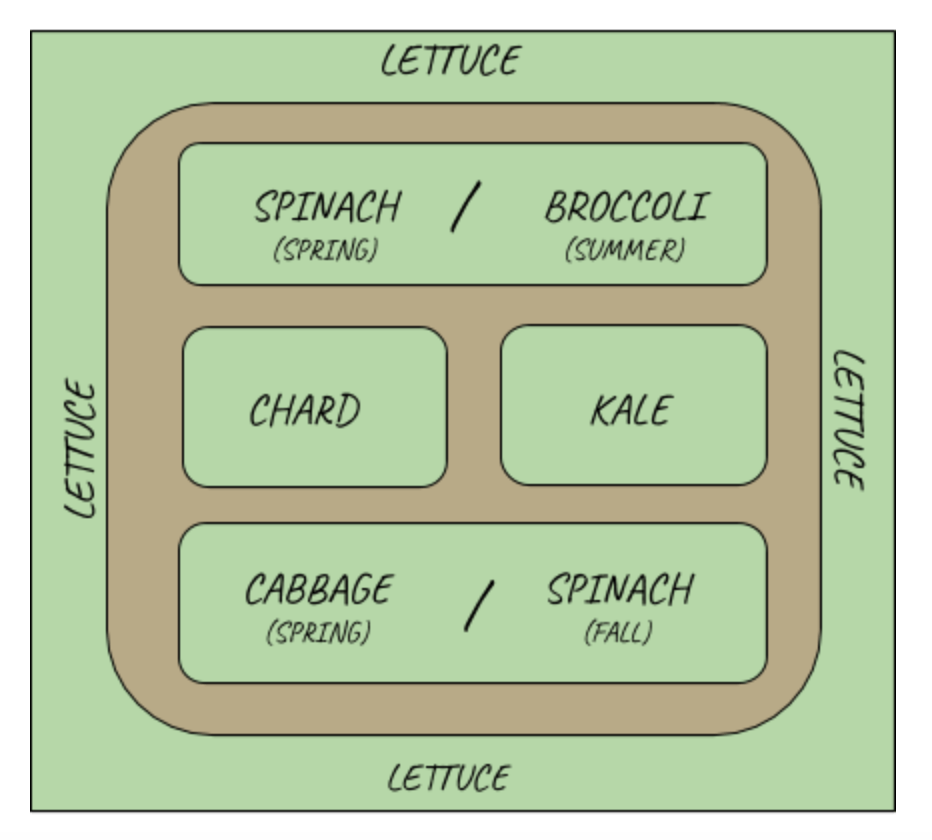
What I plant is dependent on two things: the date I plan to plant outdoors (the cold-hardiness of the plant) and the time it takes to get to plant out size. This is generally speaking 4 weeks after germination for most plants. Germination time, however, can be quite variable from a couple of days to 3 weeks. More specifically, onions are the first seeds I plant, then hardy greens like lettuce and spinach, then parsley because it takes a long time to germinate, and cilantro because it thrives in the cold to name a few. Observe, take notes, and don’t expect to get everything right. This is an art form with nature as collaborator; learn to work with her.

The Forgotten Dimension

Uncategorized

The forgotten dimension, the vertical. The lack of this one feature is the easiest way to spot a beginning gardener. And conversely, the easiest way to make your garden look as good as anything in a glossy magazine spread is to add vertical interest. Vertical interest can be defined as anything that rises at or above eye level. This interest can be plant material or hardscape. When creating two very large perennial flower boarders for my son’s wedding I added six 8-foot tuteurs (wooden towers) painted a deep purple. They added color, continuity, and height to a new garden making it appear more mature than it was.

Photo credit: Robert Murdock

Staggering heights in a flower garden also adds interest. Don’t fall into the trap of regimented tall plants in the back with medium and low growers in front. Mix it up a bit and have a surprise tall spike here and there upfront. The classic English mixed perennial border is when trees and shrubs are combined with perennial flowers. This combination guarantees vertical interest. Be careful to pay attention to the mature heights and widths when adding these larger elements. If you only have room for a small garden anchoring it with one well-chosen shrub will suffice.

Vegetable garden interest and productivity are also enhanced by growing up! Examples are pole beans growing up a bamboo tepee or simply adding tall crops like corn or sunflowers to the mix.  Similar to the tuteurs in the flower boarder, paint a post a fun color and top it with a birdhouse. Grow a vining flower or vegetable on it or not, it’s up to you. Vegetables that grow on vines can be trained to grow up on a support. Try cucumbers, squash, pumpkins, peas, beans, gourds, or even tomatoes. The types of supports they can grow on is only limited by your imagination.  Use upcycled materials when you can. An old gate, a recently pruned or fallen tree branch (white birch looks especially good used this way), the base of an old standing lamp are some examples. Building a trellis using a piece of fencing or hog wire which is very heavy gauge fencing that comes in 4’x20’ panels, works well for heavier vegetables like pumpkins. Attaching it to metal or wooden posts makes a great archway entrance to your vegetable garden. If you have a small poly tunnel for starting seeds, you can remove the plastic in the summer and use the upright hoops to train vines. This has the added benefit of creating a shaded area underneath to set up a sitting or dining area. Add fairy lights…magical.

On the Edge

Uncategorized

Spring in the garden is “new” in the best sense. New with no mistakes in it. If you are a reader of books on garden design you will have heard about “good bones.” This means that the structure of the garden is strong and pleasing. There is no better time to access this than early spring. A garden with good bones will give great satisfaction now before we start looking at it as a sea of tasks. All the snow has melted leaving neat rows, squares, and mounded beds in attractive patterns and textures in a palette of tans and browns. We are full of hope. This year…..

Practical doesn’t trump beautiful. A vegetable garden can be every bit as beautiful as a flower bed. Even accounting for differences is style and taste, what makes a vegetable garden beautiful is order. The design can be straight rows, raised beds, geometric patterns, or free-form. What establishes a sense of order is the clear demarcation of bed and path and garden and lawn. In a word – edging.

Many beginning gardeners think edging in wood, brick, or stone is the best way to accomplish this. While these are valid approaches and can be very attractive, it’s actually more difficult to maintain. It’s much easier to till freely and re-establish an edge with a grass path each year with touch ups as necessary. A flat spade or an edging tool is best for the job. First, clearly delineate your edge (see below) use one of these tools and use your foot to push down vertically to cut the roots of the grass then throw the soil onto the bed creating a mound. Pull free any weeds or plant roots. A garden that is well edged will look good even if you are behind in your weeding.

Ways to Mark an Edge:

Straight lines can easily be marked with a ball of mason’s string (mason’s string stretches less than standard string) between two stakes at either end of the bed. A circular bed can be made by fashioning an oversized compass. Simply tie the end of a string to stake in the middle of the bed. Extend the string to the desired radius and walk in a circle marking the perimeter as you go. Tie a bottle of garden lime to the end of the string and tap out bits as you go around the edge. Curves are easily made by using the garden hose as a “string.” This method makes gentle curves your lawnmower can cut around.

As well as edging within a garden an edge or frame around the garden is essential. The frame could be a traditional picket fence, a structural plant like the pyramid shaped Alberta spruce in each corner, or a surrounding brick path. A vegetable garden with good bones can hold its own in any overall landscape plan and doesn’t need to be hidden behind the garage. A garden that is beautiful is a magnet for the gardener and is more likely to be maintained.

~Kat

Start Small!

Uncategorized

Admire large gardens, plant small ones.

If you only have a small area in which to garden or a limited amount of time to devote to gardening consider making one of the following 10 x 10 ft specialty plots. Gardeners with limited time or space often make the mistake of trying to grow a little bit of everything but then become discouraged by their low productivity. Instead, try becoming self-sufficient in only one or a few vegetables at a time, adding varieties as space, time, and expertise allow. These 10 x 10 ft plots are practical because they are easy to work and maneuver around but any shape you choose can do.

NOTE – Yield is based on Jon Jeavons most conservative estimates in “How to Grow More Vegetables in Less Space than You Thought Possible.”

Eat Your Greens Garden

This garden is filled with greens for fresh harvesting like lettuce and kale as well as spinach and broccoli that you can freeze and eat all winter. Enjoy fresh lettuce over a longer season by staggering the planting. Plant a side every 2 weeks with 15 -20 seeds. Spinach can be planted twice, in spring and again in the fall after the cabbages are harvested. Chard and kale can be cut again and again all season. Broccoli also loves the cold weather so they can be planted after the spinach and picked well into the fall. Look for varieties that produce side shoots after the main head is picked for even greater productivity.

The Staples Garden

The Staple Garden is an easy plot that gets planted in early spring. Once planted, a thick mulch reduces the need to weed. At the end of the season you can expect to have 50 pounds of potatoes, 25 pounds of onions, and 25 pounds of carrots. Like money in the bank!

Plant Protein Garden

Vegan? Trying to reduce your meat consumption or just enjoy these protein packed veggies? Either way, this 100 square foot plot will yield 30 pounds of green beans, 5 pounds of peas and 10 pounds of soybeans (edamame). Plenty to eat now and more to freeze for later.

Hint: Use a tepee or trellis for the peas to increase yield.

Tomato Sauce Garden

Plant paste tomatoes in this garden for the richest sauce. Try Roma or Amish Paste. They are meatier than slicing types. You can expect to harvest 50 pounds of tomatoes from this garden. Season with onions, garlic, and basil to create a flavorful sauce to enjoy all winter.

The Pickle Garden

Get out your favorite pickle recipes! Whether you like pickles sweet or dilled, you will have plenty of produce to fill your shelves.

Hint: plant sweet green or hot peppers but not both or they will all be hot!

Herb Garden

Herbs are more than seasoning. They are beautiful and many offer health benefits of their own. For example, dill has long been used as a digestive aid. This is why it is often found in recipes like cole slaw to aid in digesting the cabbage. These herbs can be used fresh, dried, or preserved in oil or vinegar.

Think Outside The Box

When you decide you are ready to add more garden plots think about more than straight lines. A vegetable garden can be beautiful too!

~ Kat

The Humble Onion

Uncategorized

I love onions. One of my tricks when I spent the day reading and forgot to start dinner was as soon as I heard my husband’s car in the driveway I would jump up; whack a cast iron pan on the stove, turn it on high, add olive oil and onion. By the time he stepped over the threshold he invariably said,” Something smells good!” I responded, “Just a few more minutes!” Onions save the day! Honestly, how anyone can resist their sweetness is beyond me.

Now I know onions aren’t the most expensive vegetable in the grocery store but since we eat so many of them I’d like the cleanest chemical –free ones we can get. No better way to do that than grow them yourself. You see the sets in all the hardware stores and garden centers in the spring. These are an easy alternative and one I took advantage of as a young gardener. Sets are simply onions seeds that are planted so close together literally to stunt their growth. They are then harvested, dried, and sold as sets. The next time they are planted their growth continues. But just like some plants that are root bound never fully recover, onions grown this way don’t always reach their full potential. Some just can’t break that dormancy and never grow at all. Another way to grow onions, which I have also tried; is by buying plants. These plants, usually grown in the south, are pulled up and sent through the mail. They are sent dried and as still alive are more consistently successful than sets, though are certainly stressed in the process. The lengths to which onions growers go to sell you these started plants sends the message that you can’t do it yourself. This is just not true. Growing onions from seed is easy and productive. I live in upstate NY and garden in Zone 4b/5a. I have successfully grown onions from seed for years. It does require staring seeds indoors or better yet in a cold frame. They don’t mind the chill. Packages recommend starting onion seeds in February. While this would be ideal, I have had success seeding them directly in the garden as late as May 1st, Admittedly they aren’t as big but I seek only to show you planting from seed isn’t hard or mysterious.

I follow Elliot Coleman’s suggestion of planting onions in groups of 5-6 and spacing these groups a foot apart from each other. This makes weeding between the clumps so much easier. The onions grow outward with no reduction in overall size at maturity.

When you harvest leeks and onions leave a few behind. The bulb will flower the second year. The resulting flower will rival any Allium bulb from the Dutch bulb catalogs. Tall spikes, some varieties grow to 5 feet, are topped with stunning white or steel blue spheres. These flowers have the added benefit of attracting dozens of beneficial insects. Seeds will develop from the flowers and will self-sow if left to their own devices. You can cut the flower before they drop and dry it upside down in an airy location out of direct sunlight. If picked before the seeds develop the resulting dried flower can be striking in dried arrangements. Alternately, you can collect the seed to plant next year. To do this, timing is key; you want the seeds to be as mature as possible but not yet dropping. Again, dry upside down in the same conditions as above but secure a lunch size brown paper bag with a rubber band around the flower to catch the seeds as they drop. It may not breed true if other varieties were around to cross-pollinate. The results can be a pleasant surprise and are worth a corner of the garden if you have the room. Seed saving is also an economical plan if funds are limited. Many fine old varieties would have been lost if not for some frugal gardeners.

~ Kat